

So you would like to try Windows 11? Well it is pretty easy. We are starting to see more of these installations and it is important that your currently running software works with it. It is better to test before upgrading so you know what works and what doesn’t before a full scale upgrade. I strongly suggest rolling it out in phases and per Microsoft’s Recommendations. All you have to is initiate the following five steps.
- Have at least Windows 10 Professional
- Install Microsoft Hypervisor Manager
- Download the Windows 11 ISO
- Create Your Virtual Machine
- Configure Your Newly Installed Virtual Machine
I will show you how to do this in the next Sections:
Have at least Windows 10 Professional
Unfortunately you can’t just have “Widows 10” you also need to meet the following requirements:
- Windows 10 Enterprise, Pro, or Education
- 64-bit Processor with Second Level Address Translation (SLAT).
- CPU support for VM Monitor Mode Extension (VT-c on Intel CPUs).
- Minimum of 4 GB memory You will need at least 8 GB if you are going to use Microsoft Hypervisor Manager
The Hyper-V role cannot be installed on Windows 10 Home.
Install Microsoft Hypervisor Manager
To install the Hypervisor Manager, you need to go into settings or the control panel and add Windows Featires:

All that is left is a reboot and then you can proceed to the next step.
Download the Windows 11 ISO
Please go to Microsoft’s Windows 11 Site and Download the ISO file for your region. I would recommend the Multi-Edition ISO so you can decide what version is best for you. You can leave it in your download folder of your favorite browser or you can move it to a location you would like, Just remember where you saved it. You will need it for the next step.
Create Your Virtual Machine
First Verify that your computer can support Virtualization in the BIOS / UEFI. Start the Microsoft Hypervisor Manager and click New / Virtual Machine.

This will start the Virtual Machine Wizard.

Click Next.

Name Your Machine and Click Next.

You need to choose Generation 2 as Windows 11 uses these features in order to run. You will have to come back after configuration to set the number of processors you want your virtual machine to use.

Assign at least 4 GB of memory. This is a minimum requirement for Windows 11. Having said that you will need at least 8GB of RAM on your host machine to be able to run the virtual machine. I have 16 GB of RAM on my machine. It was really helpful.

For the Networking section. Choose “not connected” for now. We will set it up after the Virtual Machine is created. For now, just click Next.

For the Virtual Hard Disk, just accept the defaults and Click Next.

In this section, please choose “Install an operating system from a bootable image file” and browse to where you saved the Windows 11 installation ISO. Click Next.

Click Finish and your Virtual Machine has been created. Now lets configure it…..
Configure Your Newly Installed Virtual Machine
Go to the main window of the hypervisor manager and right click on the virtual machine you just created and choose “Settings”. We need to configure the processors so Windows 11 can run and the networking so it can access the internet / intranet through the host machine.

Adjust the processors by clicking the item on the left pane. On the right choose 2 processors to start. That should be enough for testing purposes.
Go back to the Main window and in the right pane you will see the Virtual Switch Manager. Double click that and you will be able to create a virtual switch so the VM can get networking:
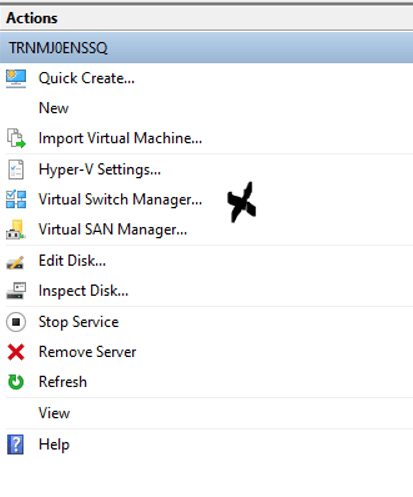
Select External and Click Create Switch:


Name the Switch and click OK.

Go back to the settings of your VM and choose Network Adapter from the left pane. In the right pane choose the virtual switch you created from the drop down and click OK.
Conclusion
You are now ready to Try windows 11. Just double click the machine you created in the main window of the Hypervisor Manager and it will begin the installation process of Windows 11 like you you were running it on Bare Metal Hardware. It’s like Hardware Troubleshooting. You need to make sure your systems will work reliably and predictably with the new OS.
Happy IT’ing
Dan
Dan
I am an IT professional with over twenty years experience in the field. I have supported thousands of users over the years. The organizations I have worked for range in size from one person to hundreds of people. I have performed support from Help Desk, Network / Cloud Administration, Network Support, Application Support, Implementation and Security.